Search results
Using an AWS S3 Bucket as your Maven Repository
Revision #1 on Jan 23rd, 2020: Replaced Spring's aws-maven with GitHub's fork aws-maven Maven Wagon. Revision #2 on Oct 20th, 2023: Added section with steps to use the dependencies you deployed to a Maven repository hosted in an AWS S3 Bucket.
1. OVERVIEW
An Amazon Web Services S3 bucket is an inexpensive option to store your Maven or other binary artifacts. It’s an alternative to feature-rich Maven repository managers like Nexus and Artifactory when you don’t have the resources to install and maintain a server with the required software or the budget to subscribe to a hosted plan.
One choice I wouldn’t recommend is to store the binary artifacts in the SCM.
This “how to” post covers configuring Maven and setting up an AWS S3 bucket to store Java artifacts; as well as the Maven configuration to use these artifacts in other applications.
2. SETUP AWS S3 BUCKET
- Sign up to create a new AWS Account or Login to AWS S3 if you already have one.
2.1. CREATE S3 BUCKET
- Click on Services -> S3 -> Create Bucket. This tutorial uses Name=maven-repo-tutorial.asimio.net and Region=US East.
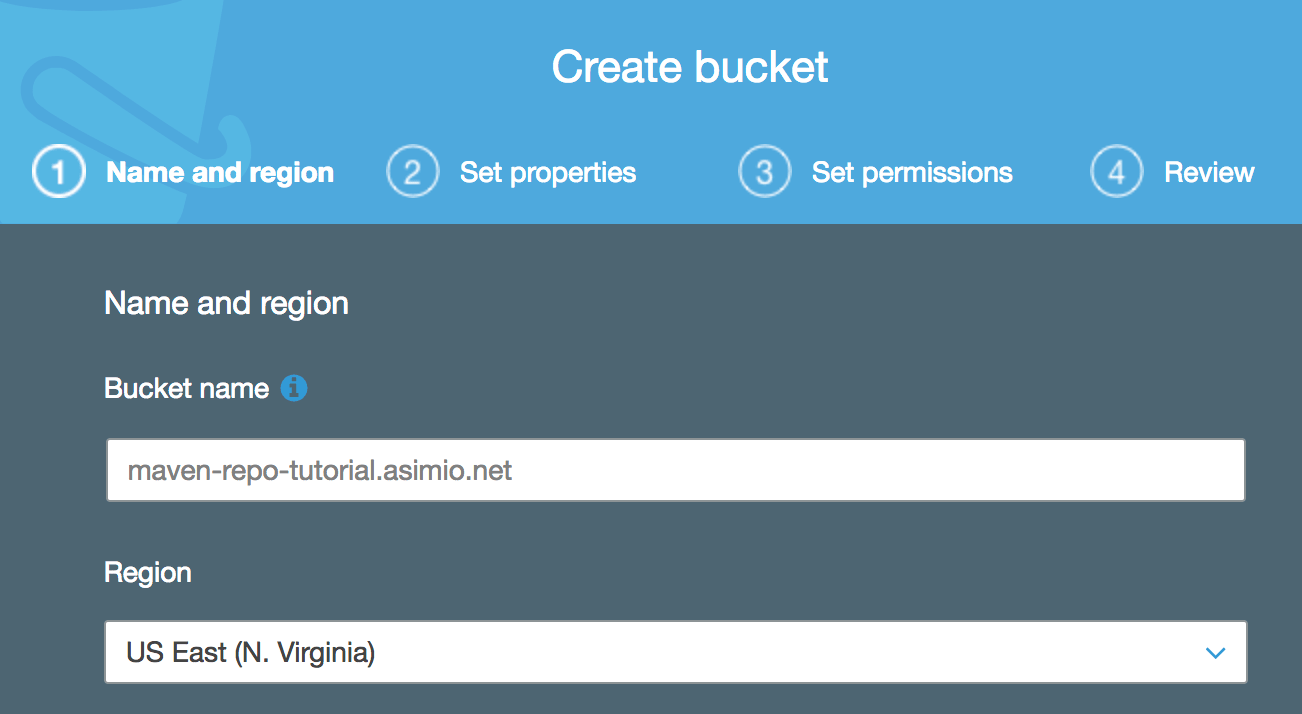 Creating an AWS S3 Bucket to store Maven artifacts
- Click Next a few times then Create bucket.
- Create two folders in the bucket:
releaseandsnapshot.
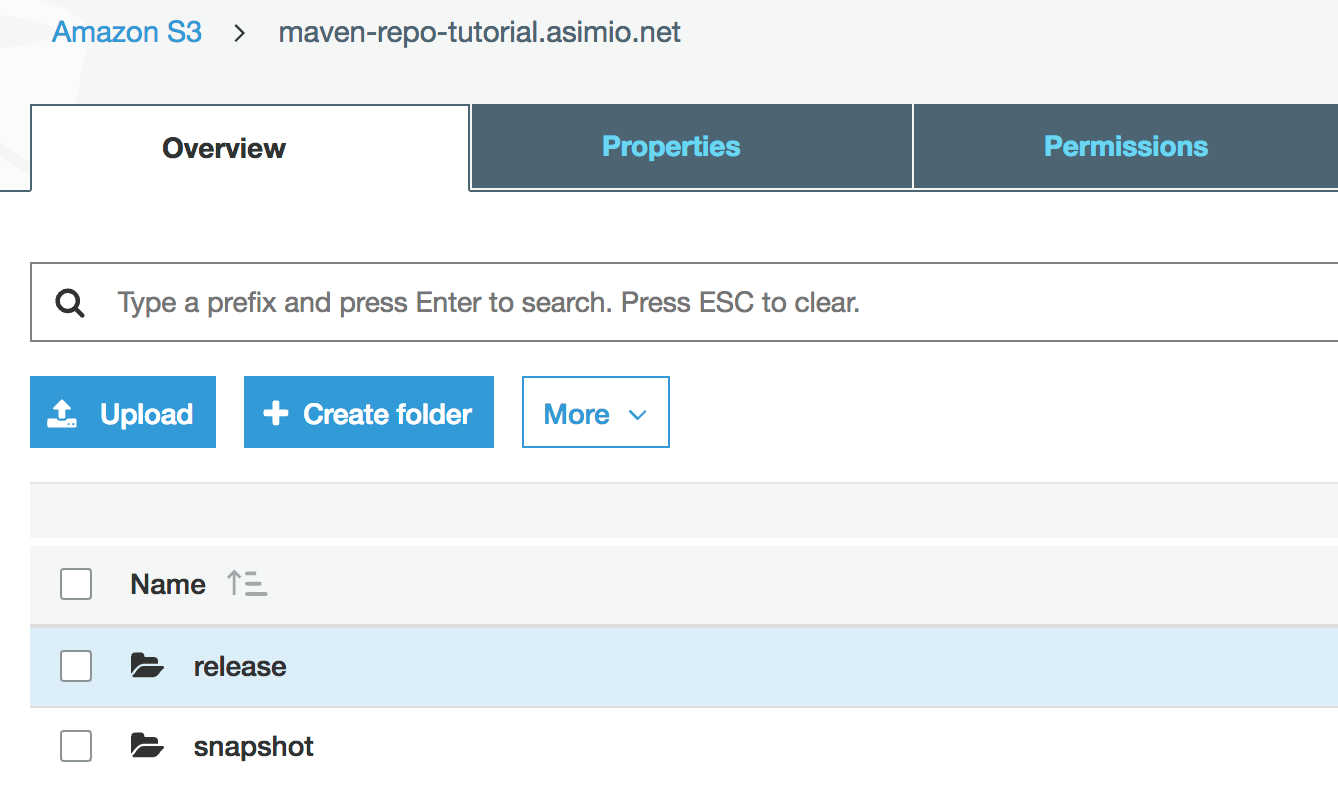 Maven AWS S3 Bucket - release and snapshot folders
2.2. CREATE IAM POLICY
- Click on Services -> IAM -> Policies -> Create policy and paste this policy in the JSON tab:
{
"Version": "2012-10-17",
"Statement": [
{
"Sid": "VisualEditor0",
"Effect": "Allow",
"Action": "s3:*",
"Resource": [
"arn:aws:s3:::maven-repo-tutorial.asimio.net",
"arn:aws:s3:::maven-repo-tutorial.asimio.net/*"
]
}
]
}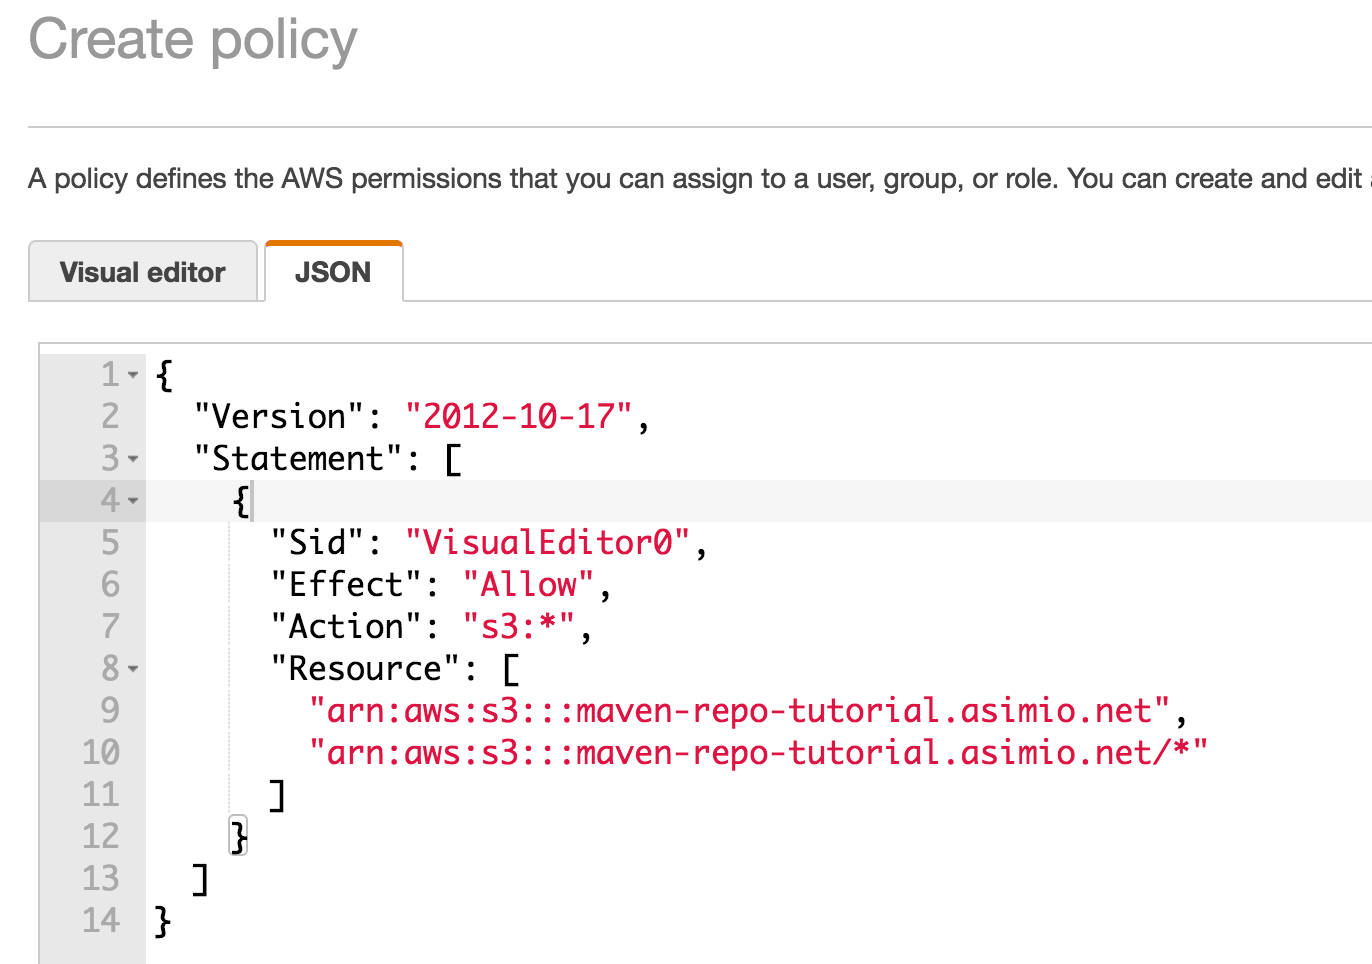 Creating a AWS IAM Policy - JSON
- Click on Review policy and Create policy to complete it. This tutorial uses Name=maven-repo-tutorial-policy.
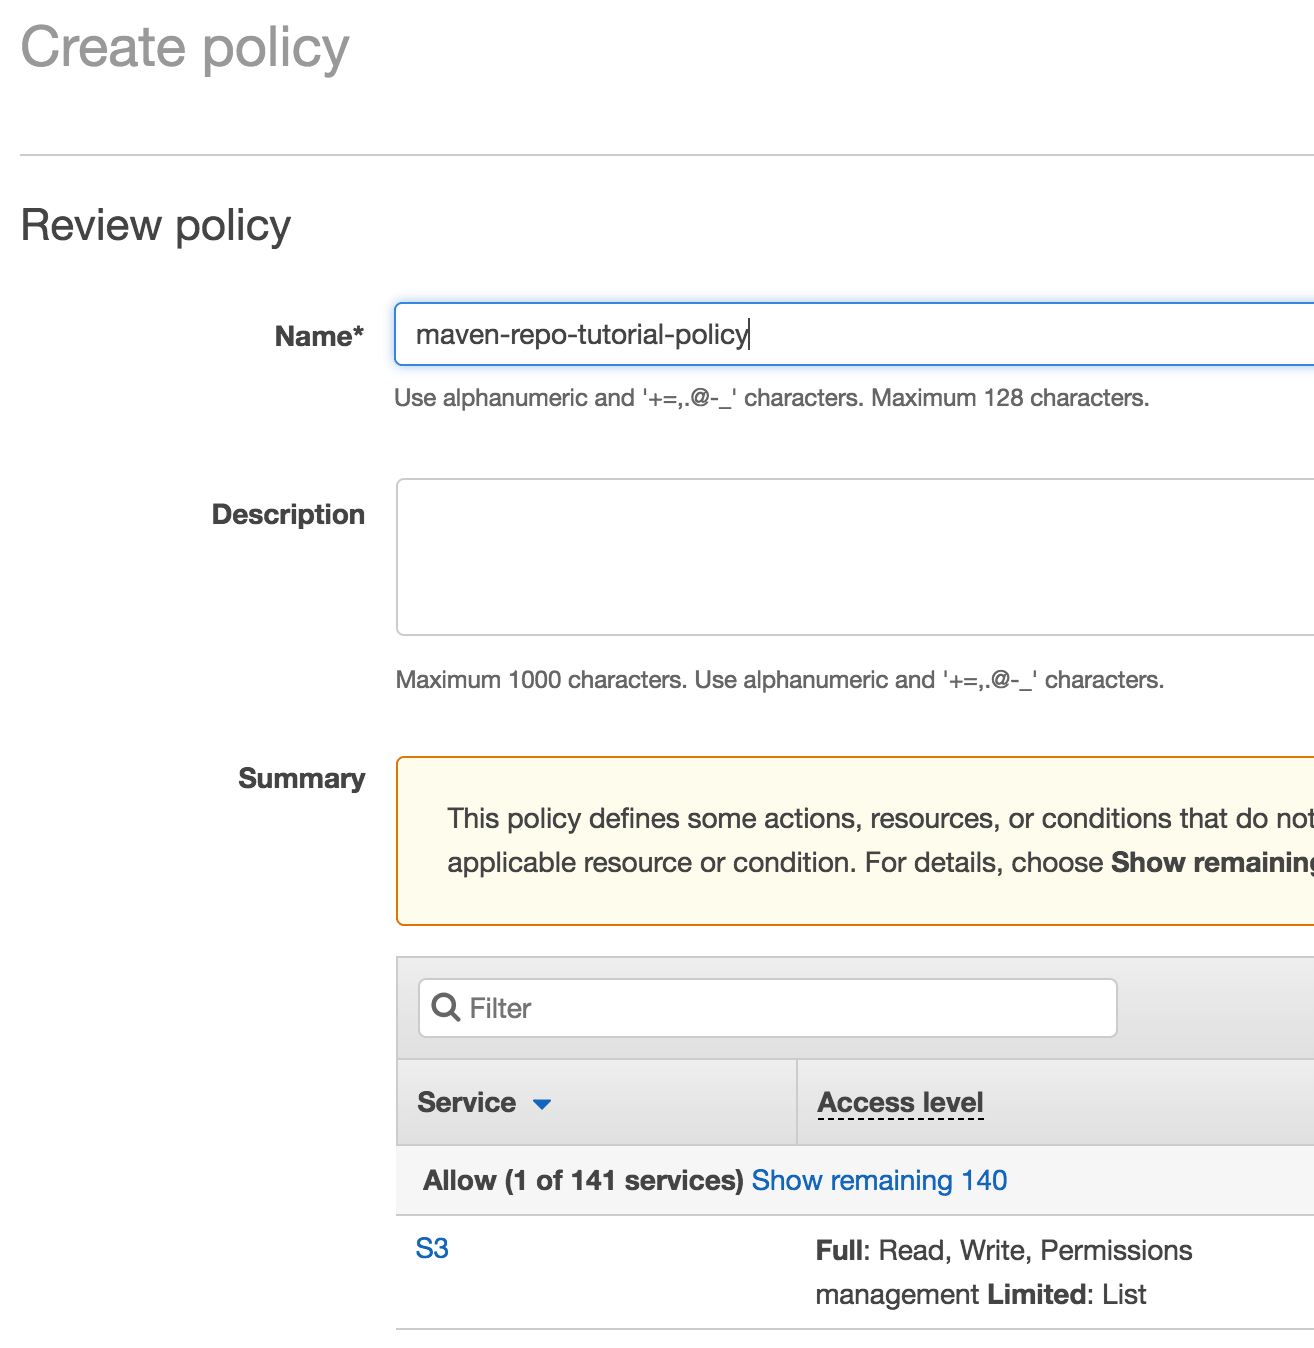 Creating an AWS IAM Policy - Name and Service
2.3. CREATE IAM USER
- Click on Services -> IAM -> Users -> Add user. This tutorial uses User name=maven-repo-tutorial-user and Access type=Programmatic access, because this guide uses the Access Key ID and the Secret Access Key as the credentials.
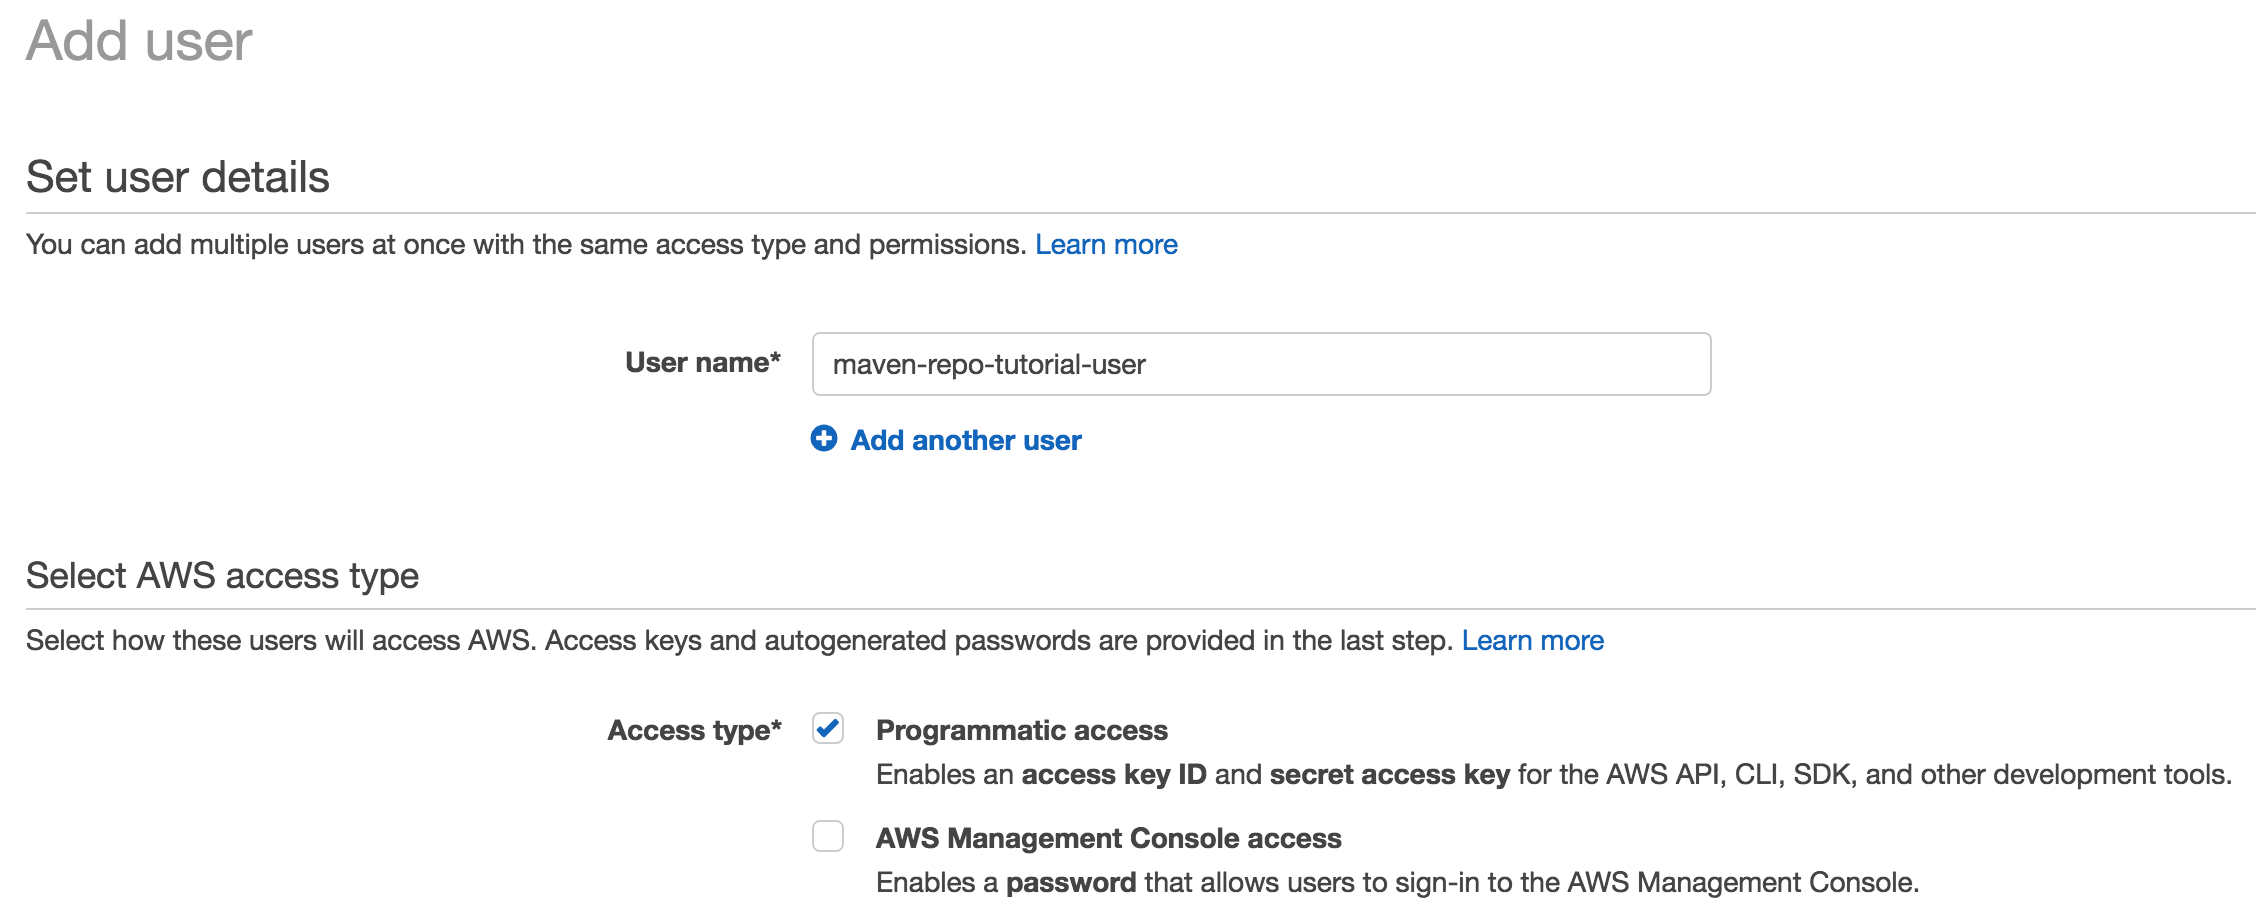 Creating an AWS IAM User - Name and Access Type
- Click on Next: Permissions -> Attach existing policies directly and select previosuly created maven-repo-tutorial-policy.
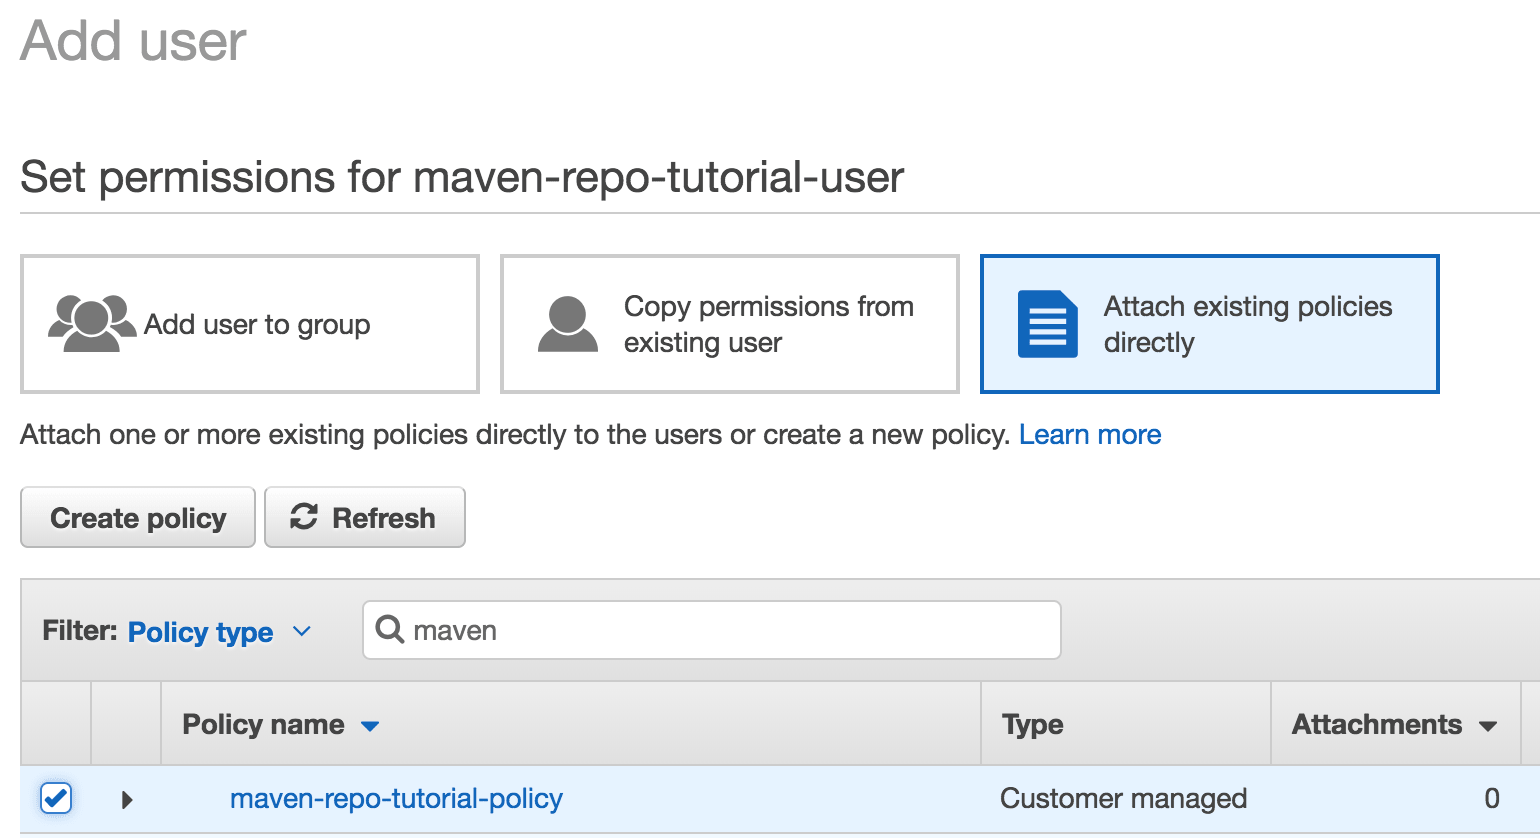 Attaching an AWS IAM Policy to an IAM User
- Click on Review and Create user buttons and store the Access key ID and Secret access key pair associated the created user in a safe medium.
Now that the Amazon S3 bucket with corresponding permissions is ready, lets change a Java application.
3. CONFIGURING MAVEN AND APPLICATION TO BE DEPLOYED TO AN S3 BUCKET
Include these updates on the Maven and application side:
settings.xml:
...
<servers>
  <server>
    <id>maven-repo-tutorial.asimio.net</id>
    <username>${iam-user-access-key-id}</username>
    <password>${iam-user-secret-key}</password>
  </server>
</servers>
...
This change could be included in your existing ~/.m2/settings.xml or in a new file as done in this tutorial.
You could paste Access key ID and Secret access key into username and password elements directly, but please make sure this file is protected and/or the password is encrypted.
Or you could pass these values via VM arguments -Diam-user-access-key-id=XXXX, -Diam-user-secret-key=XXXX.
Let’s configure the artifact’s pom.xml:
pom.xml:
<build>
...
  <extensions>
    <extension>
      <groupId>com.github.platform-team</groupId>
      <artifactId>aws-maven</artifactId>
      <version>6.0.0</version>
    </extension>
  </extensions>
...
</build>
...
<distributionManagement>
  <snapshotRepository>
    <id>maven-repo-tutorial.asimio.net</id>
    <url>s3://maven-repo-tutorial.asimio.net/snapshot</url>
  </snapshotRepository>
  <repository>
    <id>maven-repo-tutorial.asimio.net</id>
    <url>s3://maven-repo-tutorial.asimio.net/release</url>
  </repository>
</distributionManagement>
...
Notice these ids match the one from settings.xml.
aws-maven is a Maven Wagon for AWS S3, used to publish artifacts to an S3 bucket.
And that’s it configuring a Maven application or module, let’s now deploy an artifact.
4. DEPLOYING AN ARTIFACT TO AN S3 BUCKET
4.1. DEPLOYING A SNAPSHOT
mvn --settings settings.xml clean deploy -Diam-user-access-key-id=XXXX -Diam-user-secret-key=XXXX
...
[INFO] --- maven-deploy-plugin:2.8.2:deploy (default-deploy) @ springboot-togglz-demo ---
Downloading: s3://maven-repo-tutorial.asimio.net/snapshot/com/asimio/demo/springboot-togglz-demo/0-SNAPSHOT/maven-metadata.xml
Uploading: s3://maven-repo-tutorial.asimio.net/snapshot/com/asimio/demo/springboot-togglz-demo/0-SNAPSHOT/springboot-togglz-demo-0-20180625.213032-1.jar
Uploaded: s3://maven-repo-tutorial.asimio.net/snapshot/com/asimio/demo/springboot-togglz-demo/0-SNAPSHOT/springboot-togglz-demo-0-20180625.213032-1.jar (15016 KB at 4756.2 KB/sec)
Uploading: s3://maven-repo-tutorial.asimio.net/snapshot/com/asimio/demo/springboot-togglz-demo/0-SNAPSHOT/springboot-togglz-demo-0-20180625.213032-1.pom
Uploaded: s3://maven-repo-tutorial.asimio.net/snapshot/com/asimio/demo/springboot-togglz-demo/0-SNAPSHOT/springboot-togglz-demo-0-20180625.213032-1.pom (3 KB at 2.1 KB/sec)
Downloading: s3://maven-repo-tutorial.asimio.net/snapshot/com/asimio/demo/springboot-togglz-demo/maven-metadata.xml
Uploading: s3://maven-repo-tutorial.asimio.net/snapshot/com/asimio/demo/springboot-togglz-demo/0-SNAPSHOT/maven-metadata.xml
Uploaded: s3://maven-repo-tutorial.asimio.net/snapshot/com/asimio/demo/springboot-togglz-demo/0-SNAPSHOT/maven-metadata.xml (775 B at 0.6 KB/sec)
Uploading: s3://maven-repo-tutorial.asimio.net/snapshot/com/asimio/demo/springboot-togglz-demo/maven-metadata.xml
Uploaded: s3://maven-repo-tutorial.asimio.net/snapshot/com/asimio/demo/springboot-togglz-demo/maven-metadata.xml (293 B at 0.3 KB/sec)
[INFO] ------------------------------------------------------------------------
[INFO] BUILD SUCCESS
[INFO] ------------------------------------------------------------------------
...
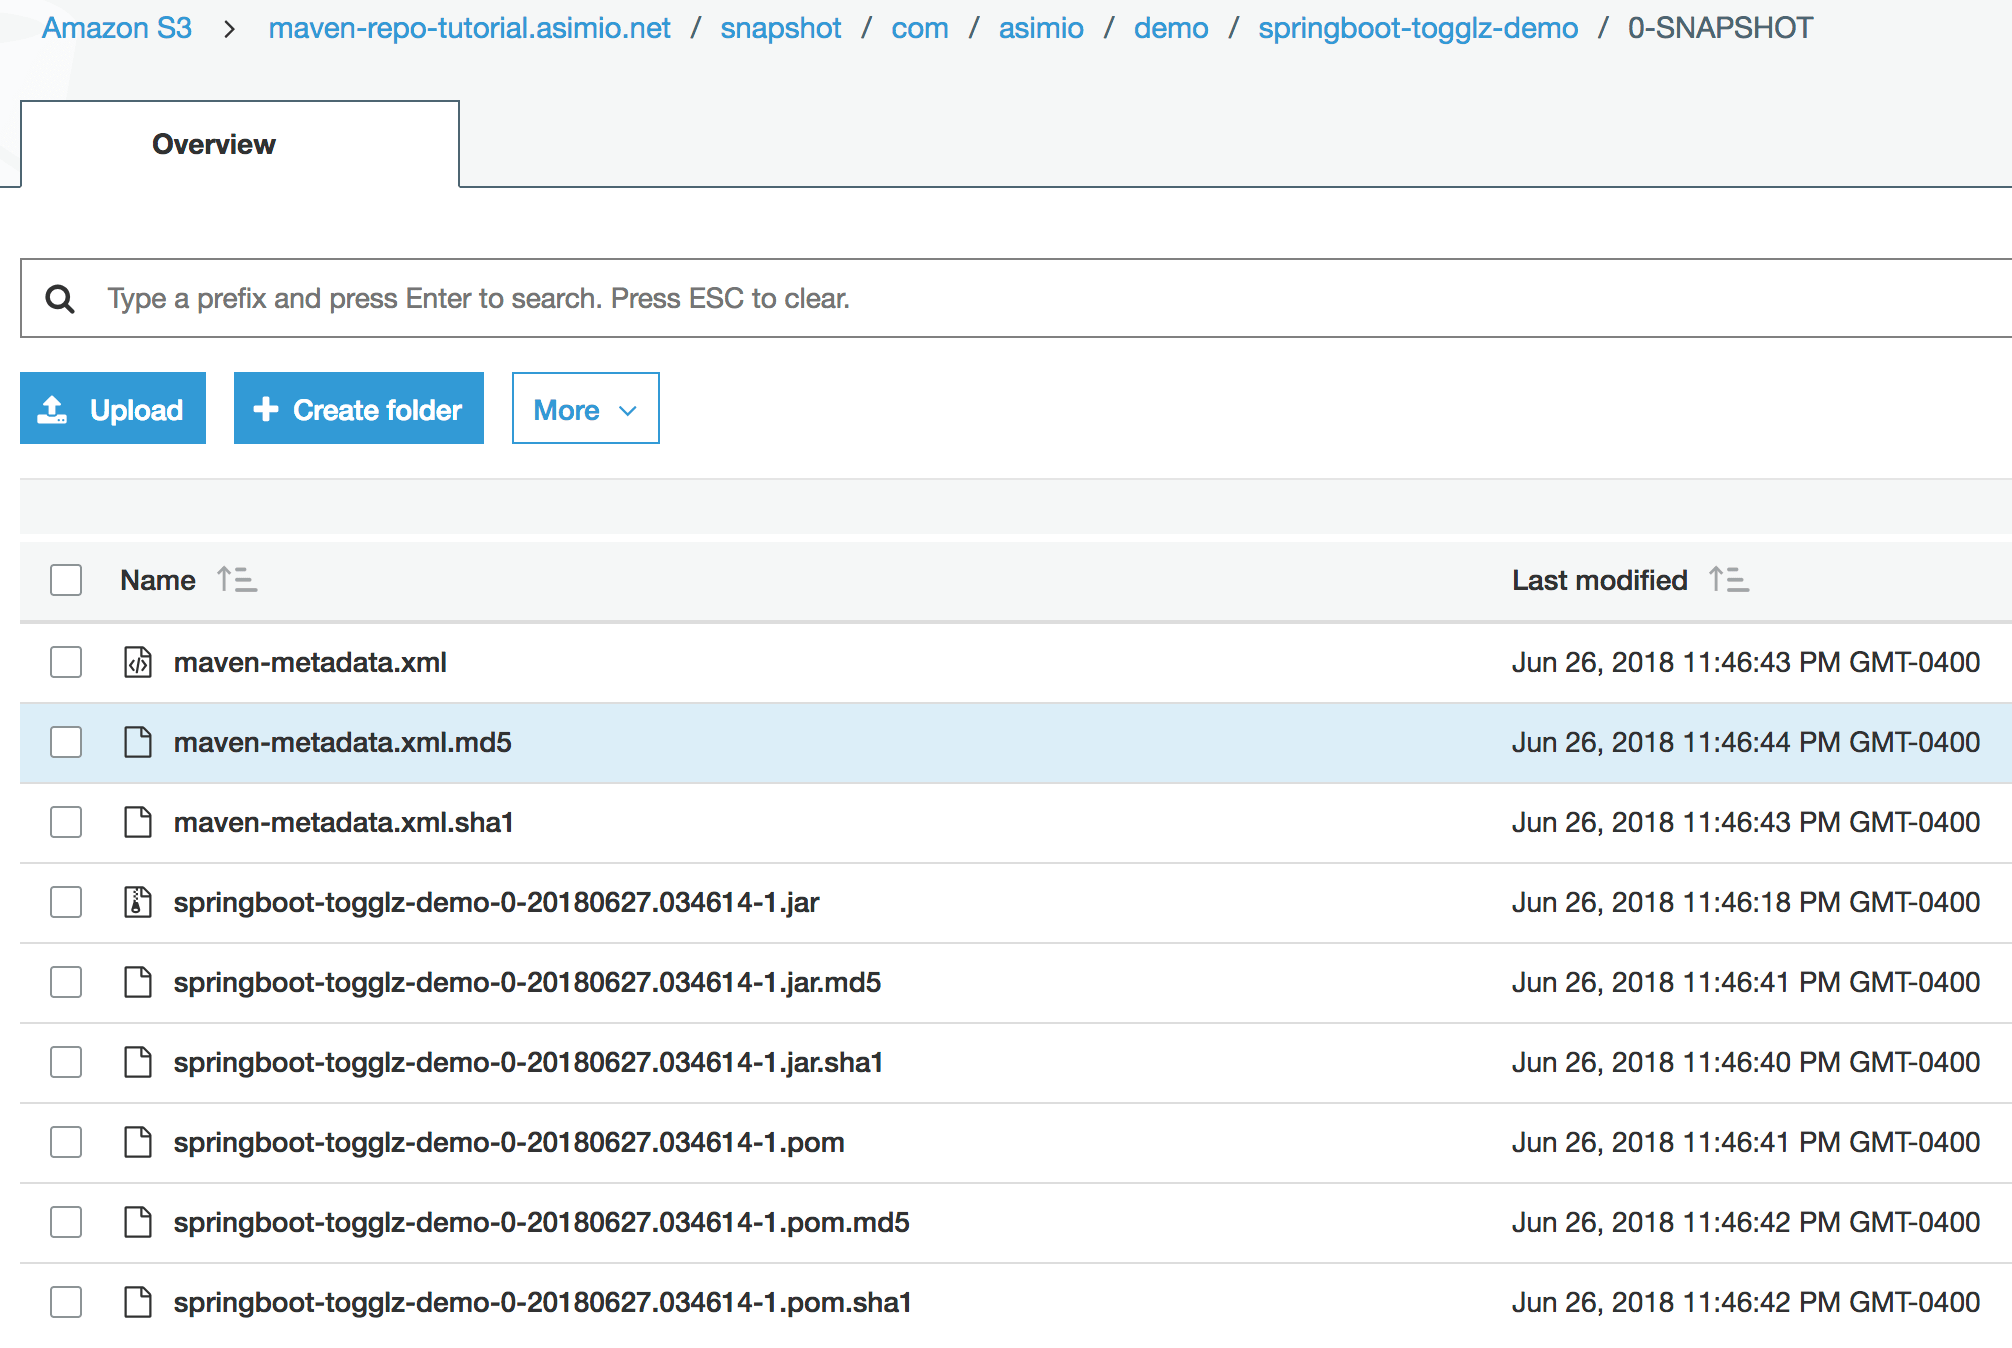
Deploying a Maven snapshot artifact to an AWS S3 Bucket
4.2. DEPLOYING A RELEASE
mvn clean versions:set -DnewVersion=1.0.1
...
[INFO] Processing com.asimio.demo:springboot-togglz-demo
[INFO]     Updating project com.asimio.demo:springboot-togglz-demo
[INFO]         from version 0-SNAPSHOT to 1.0.1
[INFO]
[INFO] ------------------------------------------------------------------------
[INFO] BUILD SUCCESS
[INFO] ------------------------------------------------------------------------
...
This command updates the version of the artifact.
mvn --settings settings.xml clean deploy -Diam-user-access-key-id=XXXX -Diam-user-secret-key=XXXX
...
[INFO] --- maven-deploy-plugin:2.8.2:deploy (default-deploy) @ springboot-togglz-demo ---
Uploading: s3://maven-repo-tutorial.asimio.net/release/com/asimio/demo/springboot-togglz-demo/1.0.1/springboot-togglz-demo-1.0.1.jar
Uploaded: s3://maven-repo-tutorial.asimio.net/release/com/asimio/demo/springboot-togglz-demo/1.0.1/springboot-togglz-demo-1.0.1.jar (15016 KB at 2167.7 KB/sec)
Uploading: s3://maven-repo-tutorial.asimio.net/release/com/asimio/demo/springboot-togglz-demo/1.0.1/springboot-togglz-demo-1.0.1.pom
Uploaded: s3://maven-repo-tutorial.asimio.net/release/com/asimio/demo/springboot-togglz-demo/1.0.1/springboot-togglz-demo-1.0.1.pom (3 KB at 1.9 KB/sec)
Downloading: s3://maven-repo-tutorial.asimio.net/release/com/asimio/demo/springboot-togglz-demo/maven-metadata.xml
Uploading: s3://maven-repo-tutorial.asimio.net/release/com/asimio/demo/springboot-togglz-demo/maven-metadata.xml
Uploaded: s3://maven-repo-tutorial.asimio.net/release/com/asimio/demo/springboot-togglz-demo/maven-metadata.xml (317 B at 0.2 KB/sec)
[INFO] ------------------------------------------------------------------------
[INFO] BUILD SUCCESS
[INFO] ------------------------------------------------------------------------
...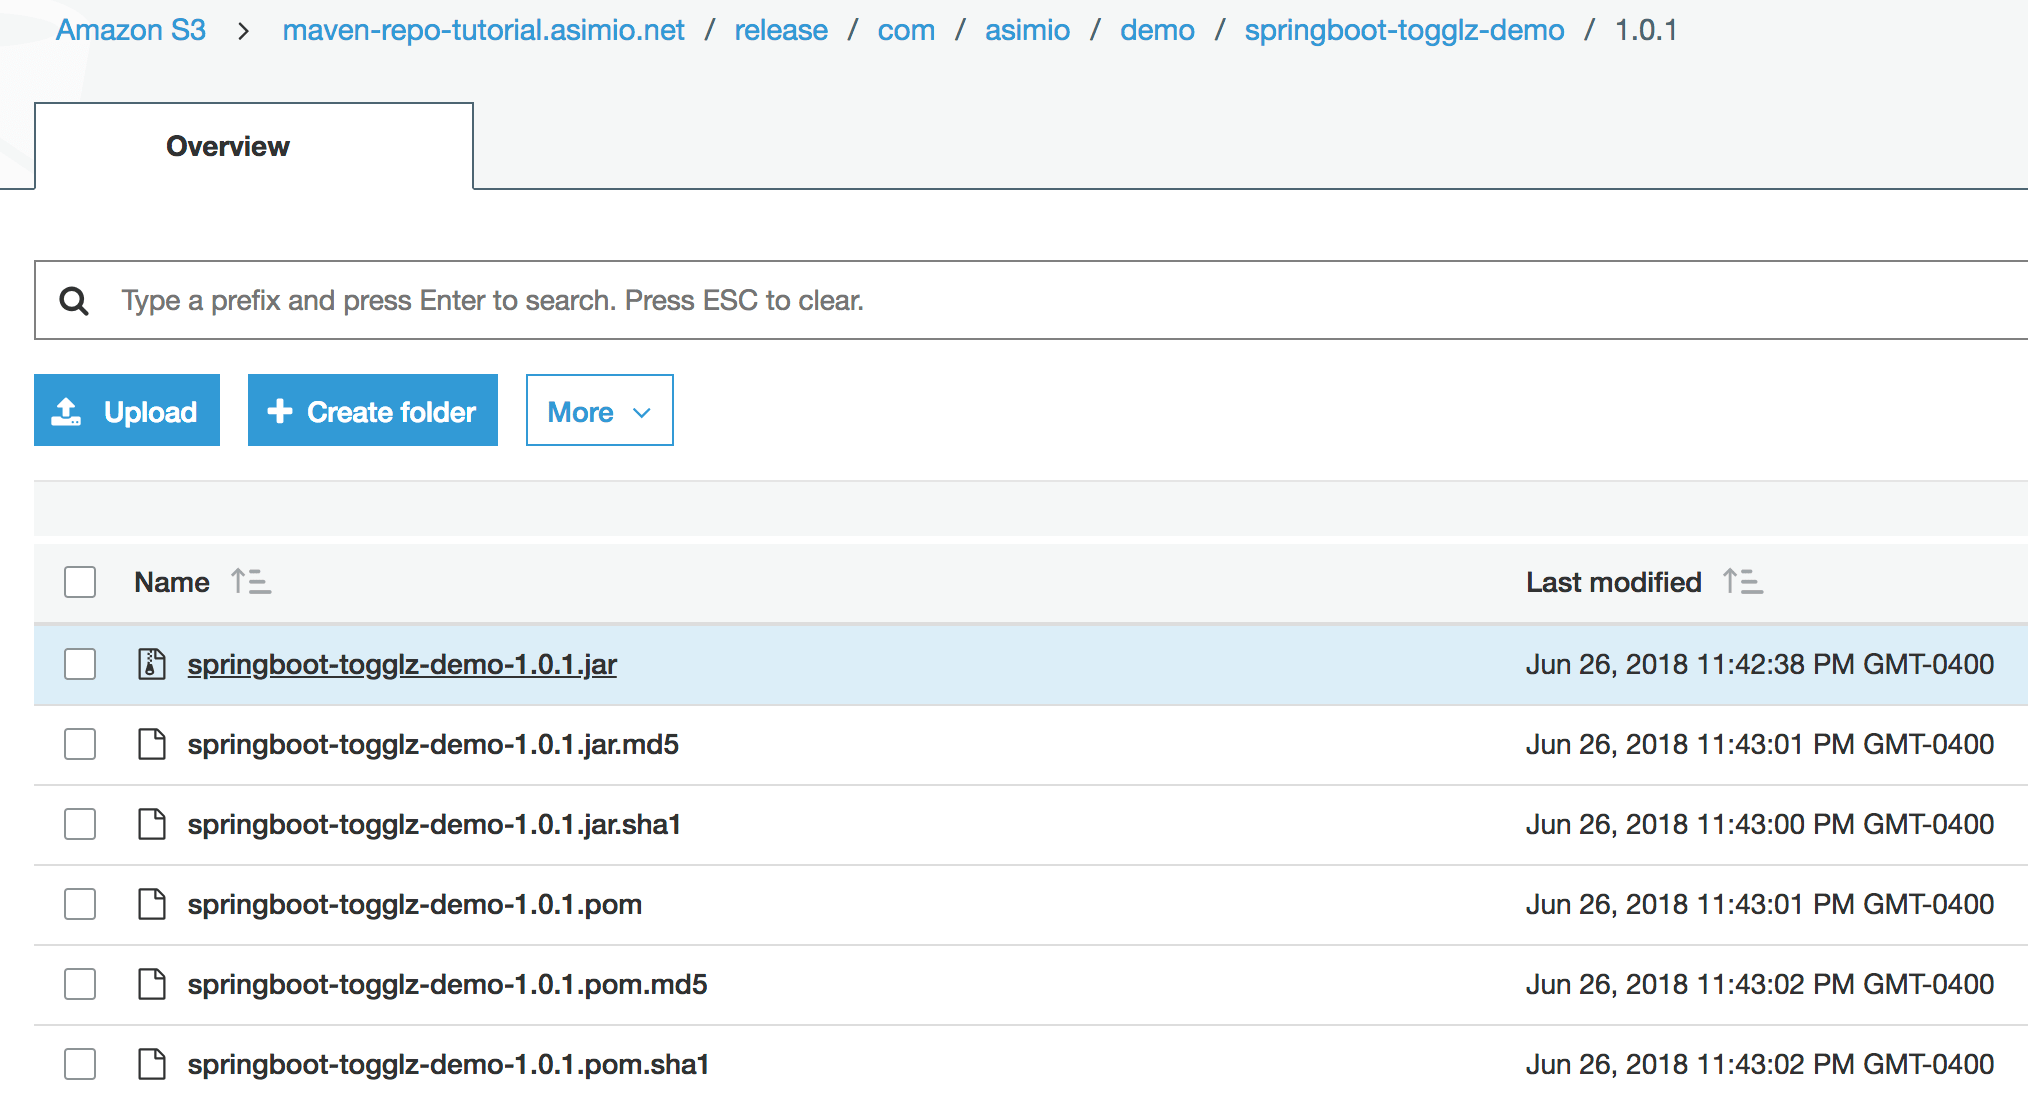 Deploying a Maven release artifact to an AWS S3 Bucket
It could be seen both, a snapshot and a release artifacts were successfully deployed to an S3 bucket.
5. USING DEPLOYED ARTIFACTS
Now that you stored your libraries or custom Spring Boot Starters in an AWS S3 bucket, how would you include them with Maven in your applications?
You need a some Maven configuration updates.
First, you need to let Maven know about your organization’s public or private repository manager.
For instance, for Maven to find your release libraries you would specify the repository location either in ~/.m2/settings.xml, which is usually the case, or in pom.xml as follow:
<repositories>
  <repository>
    <id>maven-repo-tutorial.asimio.net</id>
    <name>asimiotech-maven-repo-release</name>
    <url>s3://maven-repo-tutorial.asimio.net/release</url>
    <snapshots>
      <enabled>false</enabled>
    </snapshots>
    <releases>
      <enabled>true</enabled>
    </releases>
  </repository>
</repositories>
Second, you need the aws-maven extension in your applications’ pom.xml’s build section:
<build>
  <extensions>
    <extension>
      <groupId>com.github.platform-team</groupId>
      <artifactId>aws-maven</artifactId>
      <version>6.0.0</version>
    </extension>
  </extensions>
...
</build>
And third, you need a server configuration in settings.xml similar to this one with the credentials for Maven to connect to the AWS S3 bucket.
Make sure the repository id must match the server id, maven-repo-tutorial.asimio.net in our case.
This is how building an application that uses a dependency stored in a private repository hosted in an AWS S3 bucket looks like:
mvn -s settings.xml clean package -Diam-user-access-key-id=XXXX -Diam-user-secret-key=XXXX
...
[INFO] --------------------------------[ jar ]---------------------------------
Downloading from maven-repo-tutorial.asimio.net: s3://maven-repo-tutorial.asimio.net/release/com/nimbusds/lang-tag/maven-metadata.xml
Downloading from maven-repo-tutorial.asimio.net: s3://maven-repo-tutorial.asimio.net/release/com/nimbusds/nimbus-jose-jwt/maven-metadata.xml
Downloading from maven-repo-tutorial.asimio.net: s3://maven-repo-tutorial.asimio.net/release/com/asimio/demo/springboot-togglz-demo/1.0.1/springboot-togglz-demo-1.0.1.pom
Downloaded from maven-repo-tutorial.asimio.net: s3://maven-repo-tutorial.asimio.net/release/com/asimio/demo/springboot-togglz-demo/1.0.1/springboot-togglz-demo-1.0.1.pom (2.4 kB at 5.3 kB/s)
Downloading from maven-repo-tutorial.asimio.net: s3://maven-repo-tutorial.asimio.net/release/com/asimio/demo/springboot-togglz-demo/1.0.1/springboot-togglz-demo-1.0.1.jar
Downloaded from maven-repo-tutorial.asimio.net: s3://maven-repo-tutorial.asimio.net/release/com/asimio/demo/springboot-togglz-demo/1.0.1/springboot-togglz-demo-1.0.1.jar (15 MB at 11 MB/s)
...
This approach would be valid for a solo developer or a small team. Although a better choice than checking in the resulting artifacts into the SCM, it has some limitations. You won’t be able to Search for an artifact, which is convenient when you need to find out the artifactId, groupId and version of a dependency. Another limitation is maintenance. As the snapshot folder grows overtime, you would have to manually remove older versions.
A solution to these problems could be automated when using a feature-rich Maven repository manager like Nexus or Artifactory but as mentioned in the Overview, it would also require more effort to set it up and a running server or a subscription to a paid plan.
Thanks for reading and as always, feedback is very much appreciated. If you found this post helpful and would like to receive updates when content like this gets published, sign up to the newsletter.
6. REFERENCES
NEED HELP?
I provide Consulting Services.ABOUT THE AUTHOR


